非網頁人的 Tauri + Vue3 入坑筆記
這陣子我在使用 Tauri 寫一個電子零件庫存管理工具 —— Elebox,工具練是 Vue3 + Vuetify + Vite + TypeScript + pnpm。這篇文章稍微記錄一下我在學習並使用它們時遇到的情況及基本用法。
主要得力於 Vue 的易用性,所以我這個不是網頁技術棧的人也可以簡單寫出一個還像樣的 Tauri UI。
注意,本人非網頁前後端出身,也沒有仔細的看過教學,這篇文章的內容只是個人經驗僅供參考。若有錯歡迎指出。 以下的範例只是用法參考,不具實際意義。 本文以 TS 代表 TypeScript,JS 代表 JavaScript。
Vue3
我的前端框架選擇的是 Vue3。其實在此之前我有稍微碰過 React,但當時沒有搞得很懂,這次換成 Vue 是想說它好像比較好上手,對與我這種非網頁技術專業的人來說應該比較好。我只是想要快速地建立一個可以運行的程式,而且這個程式不會很大,甚至可能只有我自己會用而已。
在實際使用過後,我覺得 Vue 的基本概念真的是滿簡單直覺的,我甚至沒有先看過教學或官方文件,只是找幾個示範專案看個大概,然後接下來就是邊寫邊查需要的功能。
資料
為了保持 Vue 的響應性,資料要使用 ref 或 reactive 儲存。這兩著的差異不是很大,網路上的文章[^1][^2][^3]總結大概是:
ref:可以是任何型別。取值和賦值時要使用.value屬性。只會監聽頂層成員的變化。reactive:必須是 Object 或 Array。不能直接賦值(會失去響應性),真的要的話要用Object.assign()[^4]。會監聽深層成員的變化。
[^1]: 【Vue 3】ref 跟 reactive 我該怎麼選!?. 隨著 Vue3… | by Mike | I am Mike | Medium [^2]: Vue reactive() vs. ref() 都幾?. 先說結論 | by 遊隼 | Medium [^3]: 遲早你會面對的問題,Vue3 Composition API 的 ref 與 reactive 差異是什麼? | 是 Ray 不是 Array [^4]: vuejs3 - Vue.js 3 - replace/update reactive object without losing reactivity - Stack Overflow
資料要放在各組件的 v-model 中,例如 v-model="refValue"。
<script setup lang="ts">import { onMounted, ref, reactive } from "vue";import { Db } from "@/utils/database.ts";
const val = ref<number | undefined>();const package = reactive<Db.Package>({name: "NAME", pkgType: "Type", alias: ""});
async function fetchExisting() {  val.value = await Db.getValue("name");
  const data = await Db.getPackage();  Object.assign(package, data);}
onMounted(fetchExisting);</script>
<template>  <v-container>    <!-- v-model 內不用 .value -->    <v-text-field label="Value" v-model="val"></v-text-field>
    <v-text-field label="Package Name" v-model="package.name"></v-text-field>    <v-text-field label="Package Type" v-model="package.pkgType"></v-text-field>
    <!-- 直接使用 -->    {{ package.alias }}  </v-container></template>
props 屬性
元素可能會有多個屬性可以使用。例如 Vuetify 的 v-btn。
屬性名前加冒號 : 代表可以接受 TS 程式。
<!-- getState 是一個方法 -->
<v-btn  text="Delete"  density="comfortable"  icon="mdi-trash-can-outline"  :title="`Delete: ${item.name}`"  :disabled="getState"></v-btn>
動態處理元素
可以對元素使用類似 v-if、v-for 等動態處理 DOM 元素。
<v-btn v-if="btnShow" text="Delete"></v-btn><v-btn v-if="select === 'A'" text="A"></v-btn><v-btn v-else-if="select === 'B'" text="B"></v-btn><v-btn v-else text="Others"></v-btn><v-list> <v-list-item v-for="(n, i) in items" :key="i" :title="n.name" > {{ n.value }} </v-list-item></v-list>onMounted()
如果要在載入此檔案時自動執行某程式,使用 ouMounted()。
async function myFunction() {  await invoke();}
onMounted(myFunction);
async function myFunction1() { await invoke();}
async function myFunction2() { await invoke();}
onMounted(() => { myFunction1();
if (true) { myFunction2(); }});自製組件
如果要自製 components 的話,可能會用到這些:
props 傳入資料
將資料從父傳到子。但是傳入的 props 對子組件是唯讀的,如果要可以改的話,要再分配給 ref。
TreeItem.vue:
<script setup lang="ts">import { TreeNode } from "@/types/category";
const props = defineProps<{    nodes: TreeNode[]}>();</script>
<template> <v-list> <v-list-item v-for="n in props.nodes" :title="n.name"> <TreeItem v-if="n.children.length > 0" :nodes="n.children" /> </v-list-item> </v-list></template>Super.vue:
<script setup lang="ts">import { onMounted, ref } from "vue";import { invoke } from "@tauri-apps/api/tauri";import { TreeNode } from "@/types/category";import TreeItem from "@/components/Category/TreeItem.vue";
const treeNodes = ref<TreeNode[]>([]);
async function getTreeNodes() {  treeNodes.value = await invoke("get_tree");}
onMounted(getTreeNodes);</script>
<template>  <TreeItem v-if="tree_nodes.length > 0" :nodes="treeNodes" /></template>
emit 回傳資料
將資料從子傳到父。使用 emit 讓子組件可以向上傳遞資料或事件。在傳遞資料時要注意其資料結構。
Sub.vue:
<script setup lang="ts">import { ref } from "vue";
const emit = defineEmits(["update"]);
const val1 = ref<string>("");const val2 = ref<number | undefined>();
function onUpdate() {    emit("update", { type: val1.value, price: val2.value});}</script>
<template> <v-select label="Type" :items="['SMT', 'THT', 'Others']" v-model="val1" @update:modelValue="onUpdate" ></v-select> <v-text-field label="Price" v-model="val2" @update:modelValue="onUpdate" ></v-text-field></template>Super.vue:
<script setup lang="ts">import { ref } from "vue";import Sub from "@/Sub.vue";
function onSubUpdate(data: {type: string, price?: number}) {  console.log(`Type: ${data.type}, Price: ${data.price}`);}</script>
<template>  <Sub @update="onSubUpdate" /></template>
watch 監聽變化
如果要即時監聽一個資料的變更,可以使用 watch。
<script setup lang="ts">import { watch, ref } from "vue";
const val = ref<string>("");
watch([val], (newVal)=>{    console.log(`New value: ${newVal}`);});</script>
<template>  <v-text-field label="Value" v-model="val"></v-text-field></template>
路由
安裝 vue-touter 可以提供路由功能。
路由表
首先要定義路由表:
import { createRouter, createWebHistory } from "vue-router";
const router = createRouter({  history: createWebHistory(),  routes: [    {      path: "/home",      name: "home",      component: () => import("@/views/Home.vue"),    },    {      path: "/item:uuid",      name: "Item",      component: () => import("@/views/Item.vue"),    },    {      path: "/edit:item:uuid",      name: "Edit",      component: () => import("@/views/EditItem.vue"),    },  ],});
export default router;import { createApp } from "vue";import App from "@/App.vue";import router from "@/router";import "@/styles.css";
const app = createApp(App);app.use(router);app.mount("#app");在 TS 中使用
直接使用路徑:
import { useRouter } from "vue-router";
const router = useRouter();
// 回上一頁function goBack() {    router.go(-1);}
// 導航到 '/home'function getHome() {    router.push("/home");}
// 導航到 '/home',但不會記錄,會無法使用回上一頁function getHome() {    router.replace("/home");}
使用路徑名稱:
import { useRouter } from "vue-router";
const router = useRouter();
// 導航到 'Home'function getHome() {    router.push({ name: "Home" });}
// 導航到 'Item' 且帶參數function getItem() {    router.push({ name: "Item", params: { uuid: 128 } });}
function getEdit() {    router.push({ name: "Edit", params: { item: "MyItem", uuid: 128 } });}
在元素中使用
<v-btn title="Edit" :to="{ name: 'Edit', params: { item: props.name, uuid: props.id, }, }"></v-btn>i18n 國際化多語言
安裝 vue-i18n 可以使用國際化功能。
設定
import { createI18n } from "vue-i18n";import en from "@/locales/en.js";import zhHant from "@/locales/zhHant.js";
const messages = {  en,                 // English  "zh-Hant": zhHant,  // 繁體中文};
const i18n = createI18n({  legacy: false,  locale: "en",  fallbackLocale: "en",  messages,});
export default i18n;import { createApp } from "vue";import App from "@/App.vue";import router from "@/router";import i18n from "@/plugins/i18n";import "@/styles.css";
const app = createApp(App);app.use(router);app.use(i18n);app.mount("#app");詞彙表
我是把詞彙表獨立在 locales/ 資料夾下,一個語言一個檔案。
export default { home: "Home", settings: "Settings",};export default { home: "主頁面", settings: "設定",};使用
設定好後可以在 HTML 中直接以 $t() 全域使用。
<script setup lang="ts">// Empty</script>
<template>  <h1>{{ $t("settings") }}</h1></template>
TS 中可能要明確引用。
<script setup lang="ts">import { useI18n } from "vue-i18n";
const { t } = useI18n();
const headers = ref([  { key: "name", title: t("name"), sortable: true },  { key: "quantity", title: t("quantity"), sortable: true },  { key: "category", title: t("category"), sortable: true },  { key: "package", title: t("package"), sortable: true },]);</script>
<template>  <!-- 省略 --></template>
動態變更語言
引入 locale 並直接賦值語言代號即可即時變更語言顯示。記得要 .value。
<script setup lang="ts">import { ref, reactive } from "vue";import { useI18n } from "vue-i18n";
const { locale } = useI18n();
const language = ref("en");const languages = reactive([  { title: "English", value: "en" },  { title: "繁體中文", value: "zh-Hant" },]);
function changeLanguage() {  locale.value = language.value ?? "en";}</script>
<template>  <v-select    label="Select Language"    :items="languages"    v-model="language"    @update:modelValue="changeLanguage"  ></v-select></template>
路徑別名
如果專案具一定的規模的話,在 import 時使用相對路徑會出現一堆 ../ 不太方便,為此我們可以設定路徑別名。常見的就是將 src/ 設定為別名 @。
修改 tsconfig.json。
{  "compilerOptions": {    // 增加別名    "types": ["node"],    "baseUrl": ".",    "paths": {      "@/*": ["src/*"]    },
    // 省略...  },  // 省略...}
修改 vite.config.ts。你可能需要另外安裝 @types/node 來使用 path。
import { defineConfig } from "vite";import vue from "@vitejs/plugin-vue";import path from "path";
// https://vitejs.dev/config/export default defineConfig(async () => ({  // 省略...
  // 為 Vite 增加別名。  resolve: {    alias: {      "@": path.resolve(__dirname, "src"),    },  },}));
接下來你就可以使用 @ 取代 src/ 來使用絕對路徑了。
import PartList from "@/components/Part/List.vue";import NewDatabase from "@/components/NewDatabase.vue";import { DbPart } from "@/utils/part";Vuetify
我使用的 UI 元件庫是 Vuetify,也沒什麼特別的原因,當初看順眼就直接用了。
設定
import { createVuetify } from "vuetify";import * as components from "vuetify/components";import * as directives from "vuetify/directives";import "vuetify/styles";import "@mdi/font/css/materialdesignicons.css"; // icon
const vuetify = createVuetify({  theme: {    defaultTheme: "dark",  },  components,  directives,});
export default vuetify;import { createApp } from "vue";import App from "@/App.vue";import router from "@/router";import i18n from "@/plugins/i18n";import vuetify from "@/plugins/vuetify";import "@/styles.css"; // 專案的 css 在 Vuetify 後載入,才不會被 Vuetify 的覆蓋
const app = createApp(App);app.use(router);app.use(i18n);app.use(vuetify);app.mount("#app");注意,專案自己的 .css 要在 Vuetify 後,以免被其覆蓋。
使用元件
你可以在此處查看所有 Vuetify 的元件。各個元件的說明都滿完整的,且有不少範例。
基本上就是看它的 Vue API:
- Props:可用的屬性,例如
color、label、disabled。 - Slots:可以深入客製此元件。
- Event:該元件的事件,例如
@click、@update:modelValue。
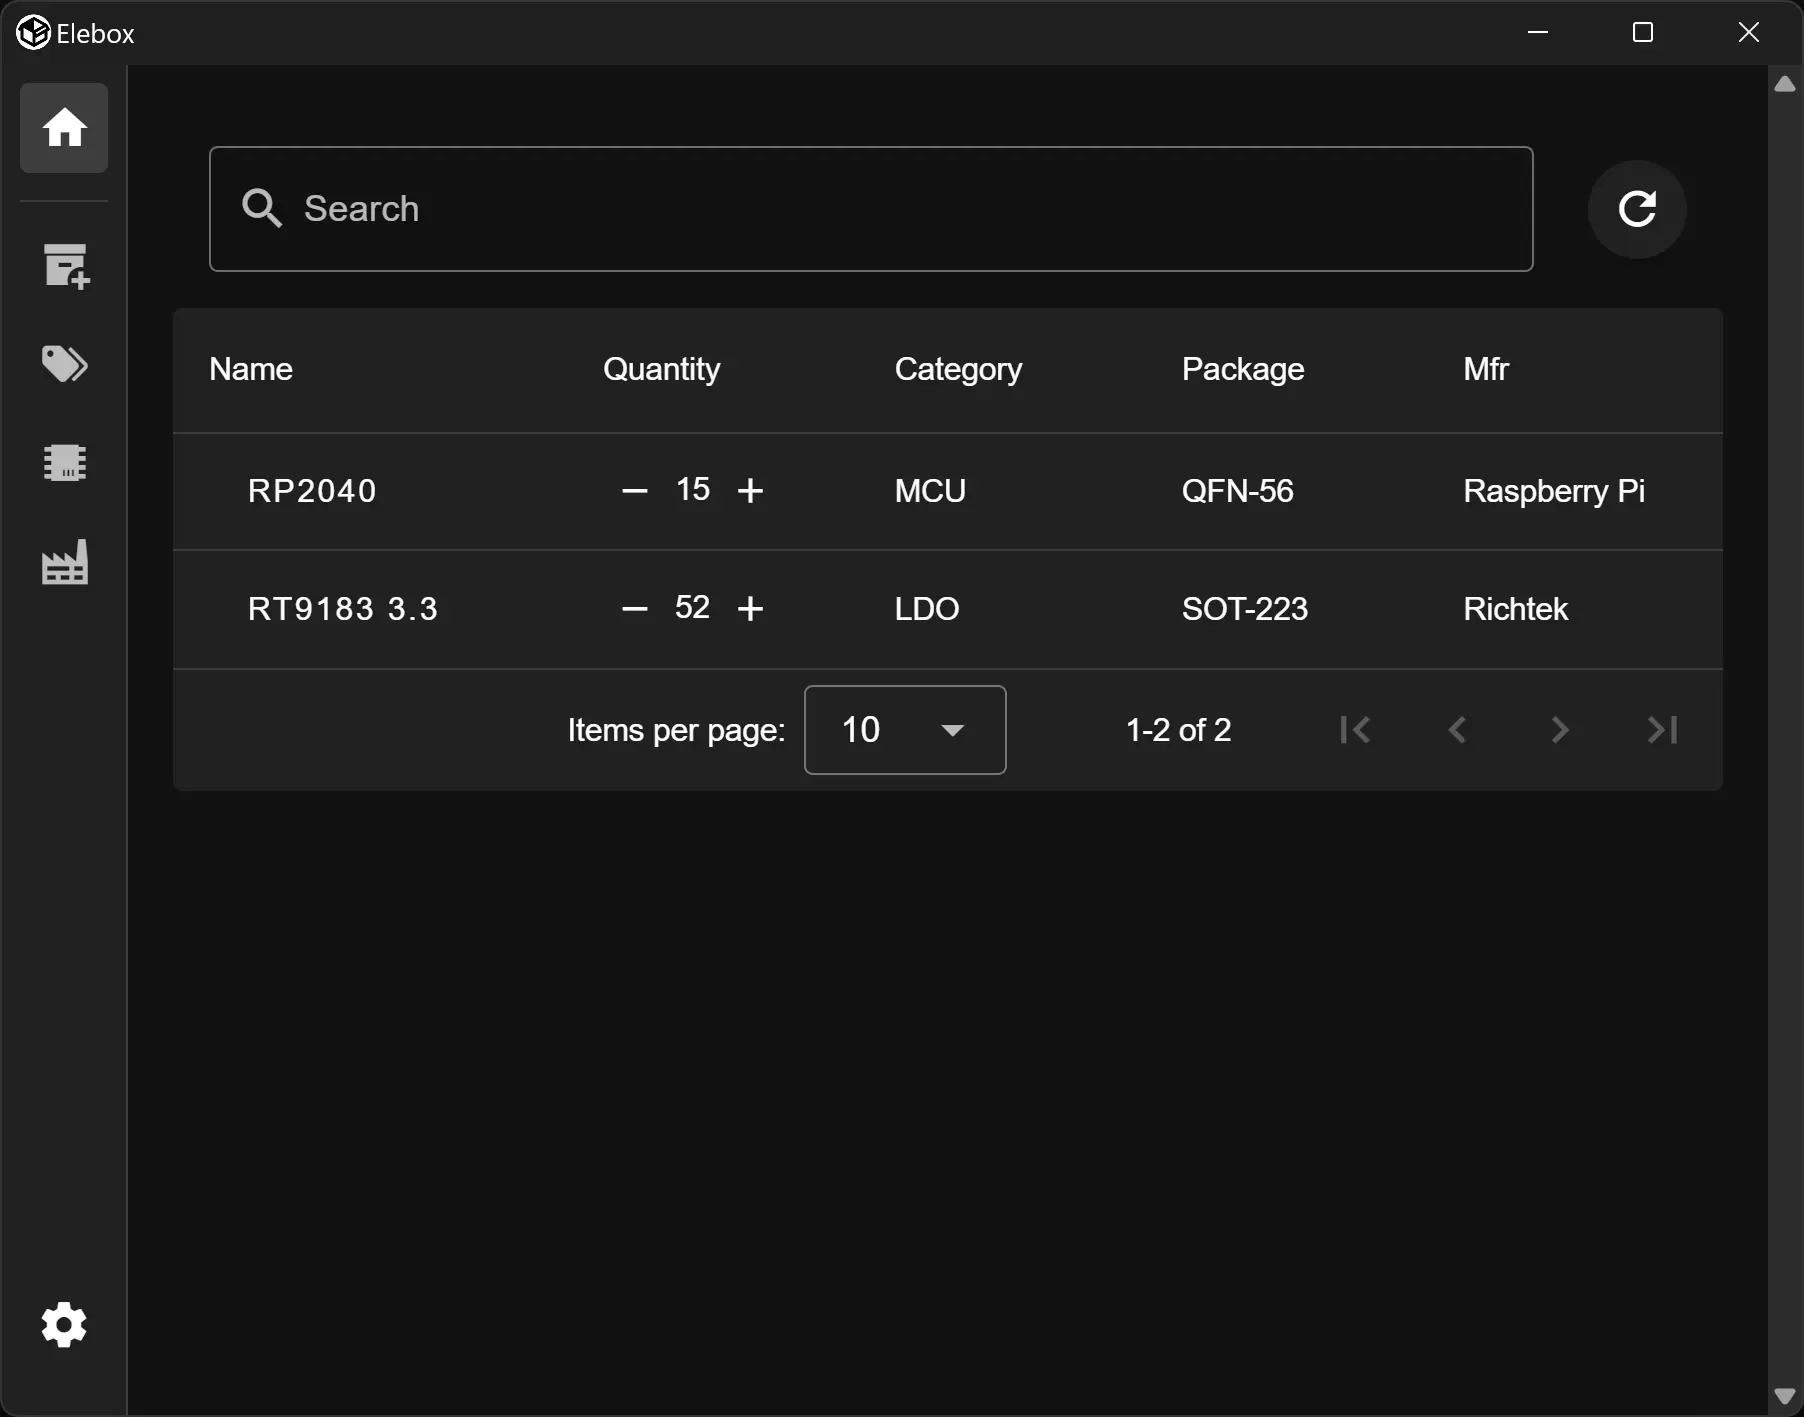
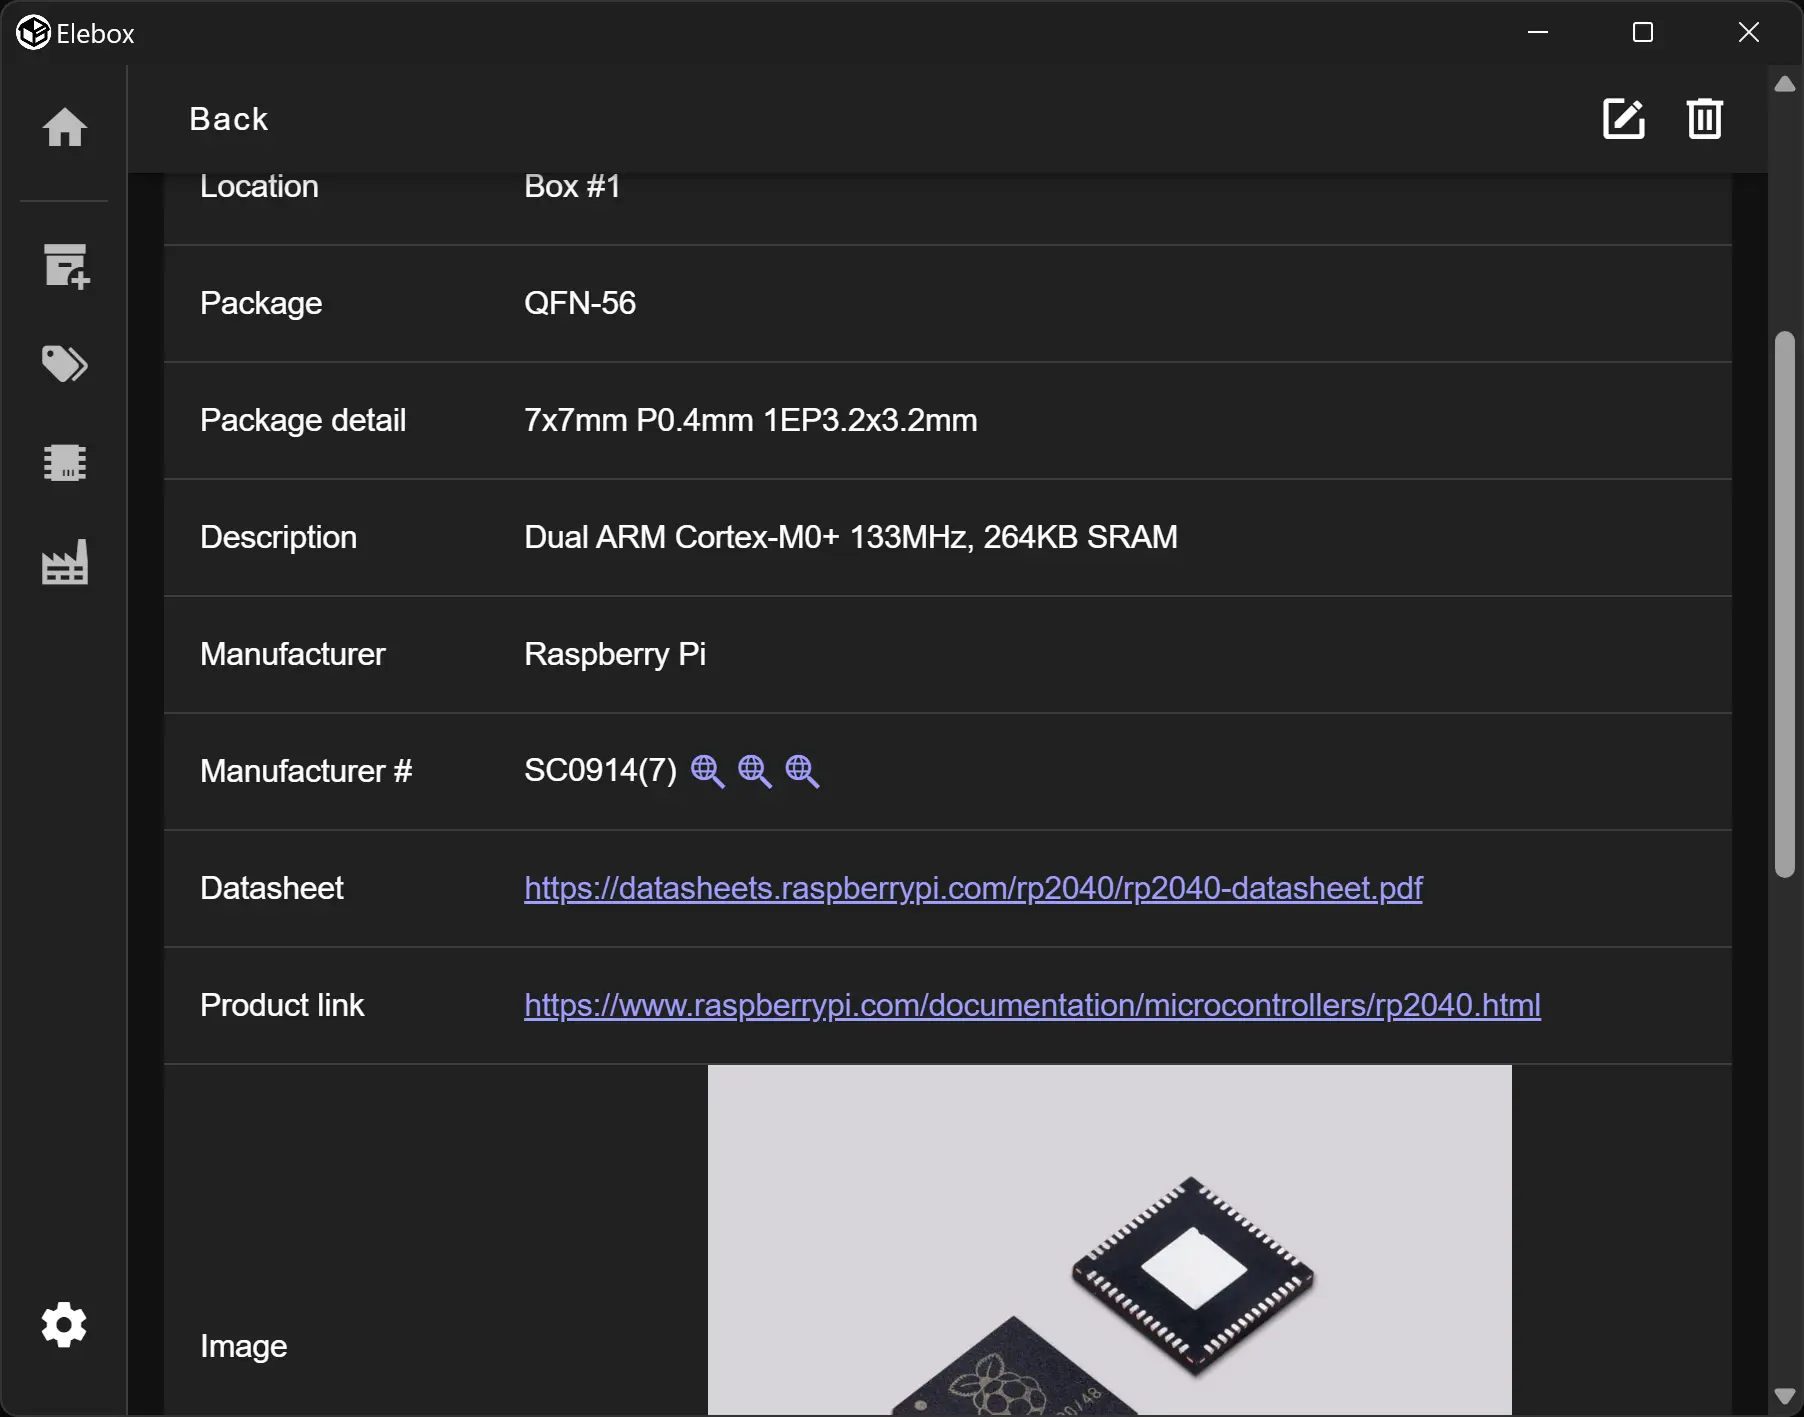
Slots 的部分可能比較複雜些,我舉一個 Data table 的範例.
<script setup lang="ts">import { ref, reactive } from "vue";import { DbPart as Db } from "@/utils/db_cmd_part";
const search = ref("");
const headers = ref([  { key: "name", title: "Name", sortable: true },  { key: "quantity", title: "Qty", sortable: true },  { key: "category", title: "Category", sortable: true },]);
const existing = reactive<Db.Part[]>([]);</script>
<template>  <v-data-table    v-if="existing.length > 0"    :headers="headers"    :items="existing"    :search="search"  >    <template v-slot:item.name="{ item }">      <v-btn        variant="text"        :to="{ name: 'part_detail', params: { name: item.name } }"      >        {{ item.name }}        <v-icon v-if="item.starred">mdi-star</v-icon>      </v-btn>    </template>
    <template v-slot:item.quantity="{ item }">      <PartQty :part="item.name" />    </template>  </v-data-table></template>
這樣的話,name 和 quantity 的內容就會是我們定義的樣子,我們可以在裡面再插入其它元件。而沒定義的 category 則會套用 Vuetify 的預設樣式。
如有想設定元件的預設值的話,可以參考 Global configuration — Contextual defaults。
排版
Vuetify 已經有定義好排版工具,但是還是需要有基本的 HTML、CSS 知識。可以參考:
基本上我就是使用 v-container、v-row、v-col、v-spacer 來排版。然後用 class="ma-4"、class="mx-4 my-2 pa-6" 來定義間隔。
<v-container> <v-row class="align-center"> <v-col> <v-text-field label="Folder" v-model="dir" ></v-text-field> </v-col> <v-col cols="auto" class="mb-6"> <v-btn>Export</v-btn> </v-col> <v-col cols="auto" class="mb-6"> <v-btn>Import</v-btn> </v-col> </v-row> <v-row class="align-center my-8"> <v-spacer></v-spacer> <v-col cols="auto"> <v-label>Version</v-label> </v-col> <v-col cols="auto"> <code>{{ app_version }}</code> </v-col> </v-row></v-container>Icon
Icon 庫我使用的是 Material Design Icons。可以參考 Icon Fonts — Vuetify。
Tauri
command
command 是 Tauri 連結 Rust 和 TS/JS 的主要功能。
// 傳入參數#[tauri::command]fn do_somethings_1(param: String, my_num: i16) {    println!(param);}
#[tauri::command]fn do_somethings_2(param: Option<String>) {    if param.is_some() {        println!(param.unwrap());    }    else {        println!("null or undefined".to_string());    }}
// 回傳資料#[tauri::command]fn do_somethings_3() -> String {    "Hello World".to_string()}
#[tauri::command]fn do_somethings_4() -> Result<(), String> {    Err("use `try-catch` for `Err()`".to_string())}
各個 command 記得要加入 invoke_handler() 中。
在 TS/JS 端使用 invoke() 來執行 command。
import { invoke } from "@tauri-apps/api/tauri";
function doSomethings1() {    // 注意此處的 myNum 名稱    invoke("do_somethings_1", { param: "Hi", myNum: 32 });}
function doSomethings2() {    invoke("do_somethings_2", { param: undefined });}
function doSomethings3() {    const val = invoke("do_somethings_3");    console.log(val);}
function doSomethings4() {    try {        const val = invoke("do_somethings_4");        console.log(val);    } catch (err) {        console.error(err);    }}
除了這些基本型別,也可以傳遞自定義的複雜結構。通常會在 Rust 定義好 struct,並在 TS 中定義等價的 interface。
注意,TS/JS 通常偏好小駝峰命名,但 Rust 偏好蛇形(底線),所有在上面的 doSomethings1() 中名稱會被轉換。如果你想要統一使用蛇形的話,要加上 rename_all = "snake_case"。
#[tauri::command(rename_all = "snake_case")]fn do_somethings_1(param: String, my_num: i16) { println!(param);}function doSomethings1() { invoke("do_somethings_1", { param: "Hi", my_num: 32 });}自動開啓除錯視窗
開發過程中常常要看除錯視窗,自動開啓會方便很多。在 main.rs 的 Builder 加入:[^5]
tauri::Builder::default() .setup(|app| { // 自動開啓除錯視窗 app.get_window("main").unwrap().open_devtools(); Ok(()) }) .invoke_handler( // 省略... )[^5]: Open WebView Dev Tools on startup · Issue #1213 · tauri-apps/tauri
管理狀態
要管理狀態的話,可以用 Mutex<T>,然後使用 .manage() 傳入,只後就可以在函式中使用。
use tauri::Manager;
struct UserDir(Mutex<String>);
// 上鎖macro_rules! LOCK {    ($db:expr) => {        $db.0.lock().unwrap() // 小心此處的 unwrap()    };}
#[tauri::command]fn get_dir(state_dir: tauri::State<UserDir>) -> String {    let dir = LOCK!(state_dir).clone();    dir} // Mutex 離開作用域會自動 unlock
#[tauri::command]fn set_dir(state_dir: tauri::State<UserDir>, new_dir: String) {    let mut dir = LOCK!(state_dir);    *dir = new_dir;} // Mutex 離開作用域會自動 unlock
fn main() {    let user_dir = get_user_dir();
    tauri::Builder::default()        .setup(|app| {            app.get_window("main").unwrap().open_devtools();            Ok(())        })        .manage(UserDir(Mutex::new(user_dir)))        .invoke_handler(            // 省略...        )
}function getDirCommand() { const dir = invoke("get_dir"); console.log(dir);}
function setDirCommand() { invoke("set_Dir", { newDir: "/new/path/" });}API
Tauri 有提供一些 API 可以在 TS/JS 中使用
dialog
dialog 可以開啓各自視窗。
在 tauri.conf.json 啓用需要的 API。
{ "tauri": { "allowlist": { "dialog": { "all": false, "ask": false, "confirm": false, "message": true, "open": true, "save": true } } }}在 TS/JS 中使用。
import { dialog } from "@tauri-apps/api";import { ref } from "vue";
const target_dir = ref("");
async function openDirDialog() {  // 開啓檔案/目錄選擇視窗  const dir = await dialog.open({    title: "Select Folder",    directory: true,    multiple: false,  });
  // typeof dir: string | string[]  if (dir) {    target_dir.value = Array.isArray(dir) ? dir[0] : dir;  }}
檔案
如果你需要處理一些 config、temp、catch 檔案的話,可以使用 Tauri 內建的 path API。
如果你想要將裝置本機的路徑轉換成 URL 以可以在前端載入的話,可以使用 convertFileSrc。
其它
其它我覺得比較好用的 API 還有:
pnpm
我的套件管理是使用 pnpm,之前我都是單純使用 npm,但聽說 pnpm 比較快且不佔空間,而且用法上也不用特別另外學,所有就改成 pnpm 了。
前端語言
我使用 TypeScript 而非 JavaScript。因為我是寫 C/C++ 出身的,比較熟悉也喜歡靜態型別,而且我想(對於大部分的資料)靜態型別對程式的穩健性和可預期性也比較好,所以就直接選擇 TS。
我以前剛開始寫 Python 時也被動態型別搞得很煩,後來裝了靜態型別檢查工具才覺得 Python 好用。